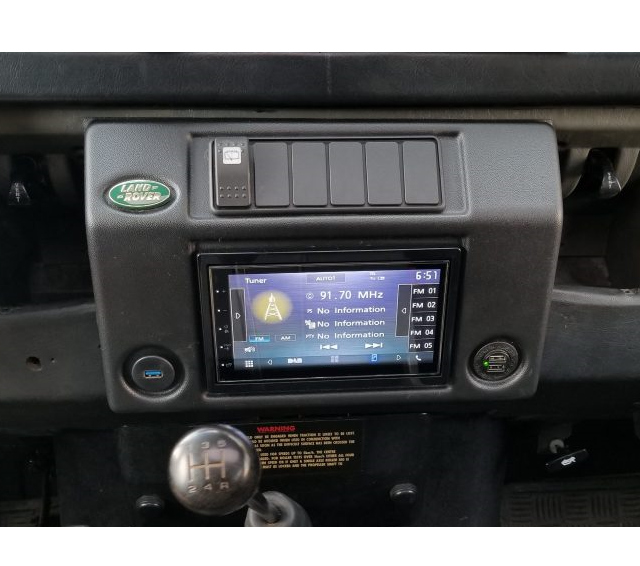
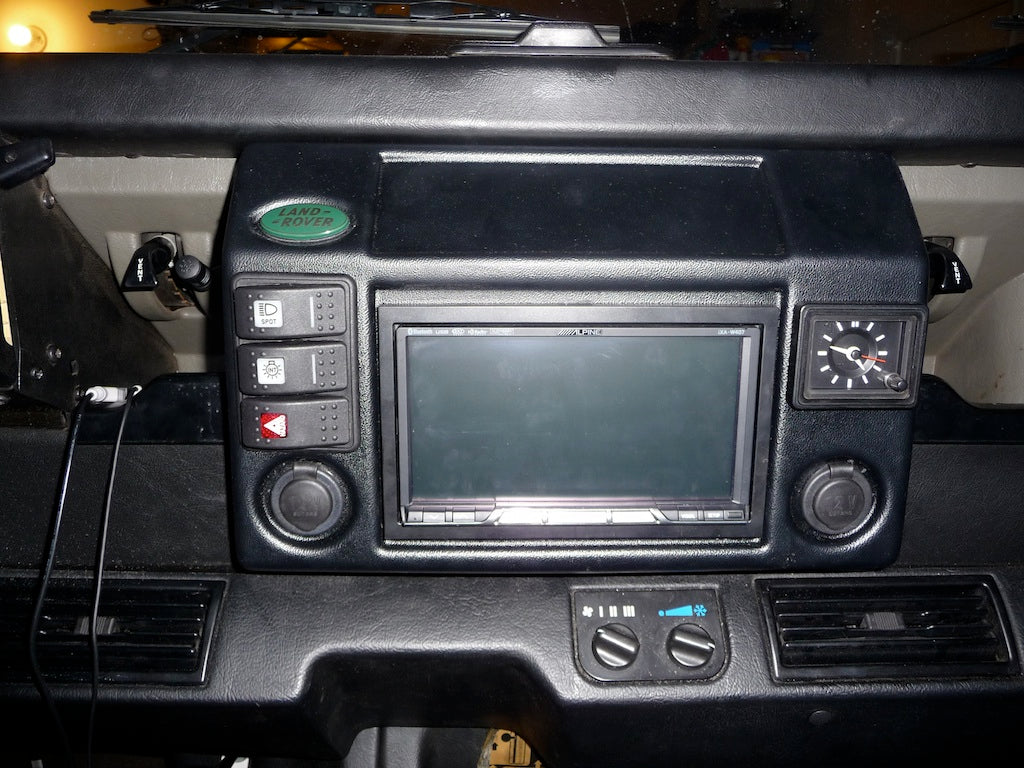
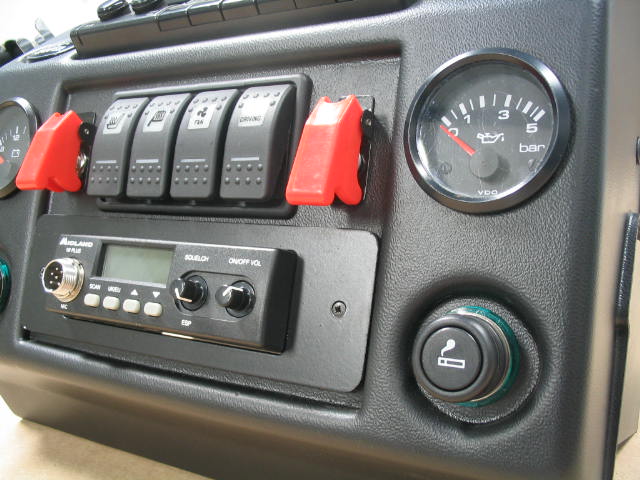
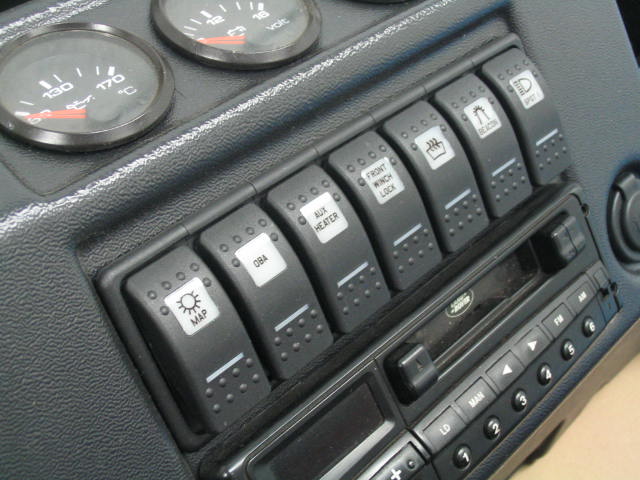
MUD Defender Console
Fitting the console into your Defender dashboard is a straightforward job suitable for any DIY’er. These instructions have been designed to give you a few tips and pointers to smooth the fitting process.
This kit will comprise the following items:
1 x MUD Dash Console moulding
4 x Spire Clips
1 x Rear mounting plate
2 x ½in screws
2 x End plates
10 x ¾in screws
General Fitting Notes and Tips
The unique design of the MUD Dash Console allows you to mount a standard DIN sized CD/Tuner head unit into one of two available locations. The head unit can either be mounted in the console in the lower recessed panel (illustrated right) or upper panel (illustrated left).

Where you mount your head unit will be based on your own personal preference and/or what other equipment you wish to install into your dash console. Bear in mind some CD players do not like operating when positioned at an angle. Please note that it will be necessary to remove a portion of the lower dash panel in order to reposition the cigarette lighter and rear wash-wipe switches within this MUD Dash Console.
DIN mounting plates are now widely available for CB Radio’s should you wish to house both a stereo and a CB Radio within the MUD console. If you want to mount a CB Radio within the console, don’t forget you’ll also need to use an extension speaker. The various surfaces on the MUD Console offer you plenty of options for mounting a speaker or if you prefer, mounting the CB radio unit onto the outside of the console. The lower panel is ideal for mounting the traditional U-shaped CB mounting bracket.
The two circular mouldings in the lower portion of the console are designed for relocating the cigarette lighter and the rear wash-wipe switch. These recesses will also take a standard DIN socket and the popular MUD Marine 12v socket which are ideal for a more secure power source than the easily dislodged cigarette lighter style socket.
The large recessed mouldings in the console have been designed to accept three 52mm/2in auxiliary gauges in a row. The dimensions of the upper recessed moulding has been designed to provide room to accept up to seven of the popular Carling Technologies Switches (pictured). Carling switches are the type of switch used by ARB.

IMPORTANT: When deciding on the layout for your console, please remember to allow sufficient clearance behind the console for switches, wiring, gauge connections and any ancillary equipment. For example, if you opt to mount your head-unit in the upper position, the angle of the head-unit when installed in the console will restrict what you can fit into the area immediately below the head-unit.

The MUD Console comes without any pre-formed cut outs to allow you to create your own unique dash design. To cut out the hole for the head unit, place the radio mounting ‘frame’ onto the portion of the console where you wish to install it and then draw round the outside of the ‘frame’. To cut out the holes in the console, we recommend using a Jigsaw, power saw (‘Sawzall’), or cut-off wheel in a ‘Dremel’ type multi-tool or similar.

To relocate the cigarette lighter you’ll need to drill a 28mm hole in the console. The socket can be positioned in either of the recessed circular mouldings. On Soft-Top and Pick-Up models, the vacant recess that would normally house the rear wiper switch provides you with the option to fit another cigarette lighter socket to use as secondary 12v power supply.

If you have purchased a Land Rover Genuine Parts oval logo from us, this fits in the oval moulding. To mount the logo, remove the plastic tabs on the reverse side of the emblem with a sharp knife and stick the emblem into place with a self-adhesive pad, or a spot of glue.

To cut out the holes for auxiliary gauges, we recommend using a hole-saw. Standard sized gauges measure 52mm/2in in diameter, however, 52mm holesaws aren’t readily available. Instead use the more commonly available 51mm holesaw and carefully enlarge the hole with a round file, coarse emery paper or ideally a Dremel tool until the gauges are a snug fit.

Cutting out the holes in the console is undoubtedly the time consuming part of the installation. Plan your layout carefully, take your time and don’t rush it! How good a job you do of fitting the radio, switches and gauges etc will determine how well the finished installation looks. Importantly, always remember: Measure Twice - Cut Once.
Installing the MUD Console
Step 1. Remove the central trim panel containing the rear-wash-wipe switch (if fitted) and the cigarette-lighter socket from the dash. Two small nuts on the rear face of the dash tray secure the two screws on the fascia. Make a careful note of which wire goes where before disconnecting the wiring plugs from the back of the cig-lighter and rear wash-wipe switch (if fitted).

Step 2.To remove the cig-lighter from the plastic panel, remove the bulb holder from the assembly and then push the inner (white plastic) section of the assembly up inside of the green outer ring. Securing tabs on the green ring will need prising back to allow you to push the white inner out. When the inner has been removed, you can remove the green outer ring. The ring is split to allow you to remove it.

Step 3. To withdraw the rear wash-wipe switch (if fitted) you’ll need a sharp pointed object like a small drill or a rivet to depress the locking pin that holds the switch knob onto the switch shaft. Locate the hole in the bottom of the knob and push your pointed tool down into this hole. Push on the spring-loaded pin at the same time as pulling on the knob. Undo the nut on the switch shaft to remove the switch from the panel.

Step 4. Remove the plastic moulding that conceals the wiring within the dash tray. This is held in place by two self tapping screws

Step 5. Remove the plastic dash rail trim by first removing the dash grab handle. Two fasteners, one of which is concealed by the Land Rover logo, secure the handle. Prise the oval logo out to access the screw behind it. Two pegs on the bottom of the handle locate it into the dash.

Step 6. Three further fasteners secure the dash top rail. The two indicated in the picture here, and one other screw on the opposite side of the dash, immediately adjacent to the instrument binnacle. With all three screws removed, the dash rail can be removed.

Step 7. What you’re left with minus the dash rail and centre panel with will look something like this.

Step 8. Next you need to mark out the lower section of dash that needs to be removed. Offer up the dash-console and centralise it using a line through the centre of the ashtray as your centre line. Mark the outer edges of the console where it touches the dash.

Step 9. Remove the console and measure inwards toward the centre of the car from both of your initial marked lines approx 20mm. This second line is your vertical cut line. Illustration shows left hand side of dash being marked out.

Step 10. Using a straight edge, mark a horizontal line directly inline with the bottom edge of the circular factory dash cutouts in the dash to intersect with the two vertical lines you’ve just drawn.

WARNING: Mark your horizontal line too low and you’ll be cutting into the double thickness metal below the cutouts.
Step 11. With both lines marked, you can now see the portion of the dash (shaded area) you need to cut away.

Step 12. After first disconnecting the battery and ensuring any loose wires are well out of harms way, cut away the dash section using a jigsaw, power saw or a fine cutting disc in an angle grinder. Don’t overshoot the corners. Always wear eye protection and cover the interior to protect from flying debris.

Step 13. With the cut out removed, your dash should now look something like this. Clean up any sharp cut edges.You’re now ready to install the console.

Step 14. Take the backing plate and place it in a central position on the rear upright face of the dash tray as illustrated below.

Step 15. Once the plate is centrally positioned, mark the fixing positions through the two bottom holes in the lower section of the backing panel. Remove the backing panel to reveal the marks and drill the holes with a 3.5mm drill. Once you’ve drilled through the plastic trim, continue to drill through the metal panel behind it.

Step 16. With the holes drilled for the lower fixings into the dash, tuck the end plates BEHIND the backing plate. The holes in the end plates and backing plate will align. Using the longer screws secure the end plates and backing plate firmly to the back wall of the dash.

Step 17. Using a 3.5mm drill, drill the holes for the remaining four fixings. For the two central fixings (arrowed right) in the plate, you’ll need to run your drill through the plastic trim and then into the steel panel behind it. Use the longer screws for these central fixings.

Step 18. The outer fixings (arrowed right) clamp the end plates and backing plate together using the shorter screws. These do not screw into the metal of the dash. The tip of the screw may – if you’re lucky – protrude through the back of the end plate and finish up inline with one of the vent gaps in the plastic trim. However, if the tip of the screw hits the plastic trim and starts to push the end panel away from the dash, simply run your drill though the hole into the plastic trim.

Step 19. The completed mounting frame assembly within the dash will now look like this. At this stage replace the dash rail trim back into the dash. If you’re packing your console with lots of ancillaries and need as much unrestricted space behind the console as possible, you may wish to remove a section of the dash rail trim between the cut-out portion of the dash (illustrated right).

Step 20. Offer up the console, making sure it sits snug up against the dash. Position the console so that the end plate of the mounting frame sits to the outside of the console. Mark the fixing positions through the holes in the end plate onto the console. When you’ve marked one side, using the same technique, repeat the process for the opposite side of the console. On air-con equipped cars, we recommend using both the fixing holes provided in the end plates.

Step 21. With the positions for the fixing holes marked, drill the holes through the ends of the console using a 4.5mm drill.The hole should be just large enough to allow the screw to go through this hole without the need to screw it through the console moulding.

Step 22. Slide the Spire-Clips onto the end plates ensuring each clip is positioned on its respective end plate with the smooth side facing outwards. The hole in the spire clip should sit over the hole in the end plate. On air-con cars use two spire clips in each end plate.

Step 23. Using the longer screws, secure the console to the end plates of the mounting frame. The holes in the end plates are slightly oversized to allow the spire-clips some degree of movement to ensure the console is a snug fit against the dash. Alternatively, enlarging the screw hole a small amount will permit another degree of adjustment.

Step 24. On the face of the console that sits adjacent the dash binnacle, you’ll need a stubby screwdriver or a screwdriver bit in a ratchet to access this fixing.

Step 25. Press the console firmly against the bottom of the dash and run your drill through the console as close to the edge of the console as possible. Once through the plastic trim of the dash you will need to drill through the steel behind it. Use a 3.5mm drill and secure the console in place using the two remaining fasteners. On air-con equipped cars, we recommend tucking the bottom of the console into the top of the air-con dash housing. Alternatively trim the bottom of the console flush with the air-con unit.

Congratulations. Job done!
To finish off the console with a ‘factory look’, why not install a Land Rover oval logo into the recess on the console. Various oval Land Rover logos used on or around the various Land Rover models over the years will fit the recessed moulding. Alternatively, we can supply a Genuine Parts Land Rover emblem to compliment your MUD console perfectly!

Delivery Costs
Estimated cost for delivery of this item only is;
UK Express- £6.80- Interlink Express (Next Working Day service on orders placed before 3pm).
EU- £20.00 (Estimated 3-10 Working Days).
Rest of the World- £28.00 (Estimated 4-15 Working Days).
Please note this is an estimated price only you will be given a final postage and packing price on checkout (purchase not neccesary).
How MUD Delivery Works
We aim to dispatch all orders within 1 working day of payment being received. In cases where the product is out of stock we will dispatch as soon as possible, however in some cases this may result in the rest of your order being delayed.
Delivery is calculated by a combination of weight x dimension x destination
Please see the guide below for a brief overview of worldwide delivery costs (you will be given a final fee on checkout, purchase not neccessary).
I am in the UK
UK parcels are dispatched with;
Royal Mail 1st Class Recorded (Estimated 1-3 Day Service),
Interlink (Next Working Day Service if order is placed before 3pm).
The price of shipping a parcel to the UK varies according to the items weight and dimension. P&P within the UK starts at £3.50. The maximum we will charge you for carriage to the UK is £10.00
I am in France, Belguim, Germany or The Netherlands
These parcels are dispatched with;
Royal Mail 1st Class Recorded (Estimated 3-10 Working Day Service),
DPD ( 2 Working Day Service if order is placed before 3pm).
The price of shipping a parcel to these countries varies according to the items weight and dimension. P&P starts at £8.00. The maximum we will charge you for carriage to France, Belguim, Germany or The Netherlands is £21.00
I am in the Rest of the EU
These parcels are dispatched with;
Royal Mail 1st Class Recorded (Estimated 3-10 Working Day Service),
DPD ( 2-5 Working Day Service if order is placed before 3pm).
The price of shipping a parcel to these countries varies according to the items weight and dimension. P&P starts at £8.00. The maximum we will charge you for carriage to the rest of the EU is £39.00.
I am in Australia & New Zealand
These parcels are dispatched with;
Royal Mail 1st Class Recorded (Estimated 3-10 Working Day Service),
UPS ( 2-5 Working Day Service).
The price of shipping a parcel to these countries varies according to the items weight and dimension. P&P starts at £8.50. The maximum we will charge you to Australia or New Zealand is £62.00 (excluding Side Panels).
I am in The USA or Canada
These parcels are dispatched with;
Royal Mail 1st Class Recorded (Estimated 3-10 Working Day Service),
UPS ( 2-5 Working Day Service).
The price of shipping a parcel to these countries varies according to the items weight and dimension. P&P starts at £8.50. The maximum we will charge you to the USA or Canada is £53.00 (excluding Side Panels).
I am in The Rest Of The World
Royal Mail 1st Class Recorded (Estimated 3-15 Working Day Service),
UPS (2-5 Working Day Service).
The price of shipping a parcel to these countries varies according to the items weight and dimension. P&P starts at £8.50.
Once you have confirmed your address you will be given a final packing and postage fee before you agree to purchase the order.